In general, using Vermeer Live should be straightforward. However, if you need help or think you have found a bug, please feel free to email me.
The general steps are numbered below. If a step varies by operating system, more specific instructions are listed as sub-bullets.
unzip vermeer.zip -d vermeervermeer-windows.bat
vermeer.jarjava -jar vermeer.jarSelect your webcam from the drop-down list in the area of the program with the settings. If your device doesn't appear in the list, try clicking "Refresh webcam list." You will have to do this if you plug in the device after starting Vermeer Live.
You can also change the video resolution using the input fields under "Webcam dimensions." Lower resolutions generally lead to smoother playback. However, setting the size too low sometimes causes the webcam to be set to its maximum resolution. You may need to experiment to find the best setting for your devices.
The reference image is what you will compare against your drawing or painting. To add one, click "Add reference image" and navigate to the image file you want to use.
Note that if you have not purchased and activated a license key, you will only be able to select from a predetermined list of images.
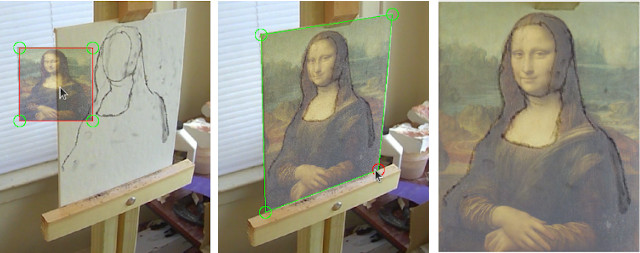
After adding the image, the next step is to click and drag the four corners of the image on top of the four corners of your paper or canvas. Once the image is aligned with the drawing surface, click Toggle view. This will hide everything outside the image, and also correct the camera perspective. At any time, you can click Toggle view to go back and adjust the alignment.
Now you're ready to draw. Use the Opacity slider to change the transparency of the reference image on top of the webcam video. There are other useful display settings too.
Make sure that the webcam has a view of all four corners of your drawing surface. Also, the drawing surface must have the aspect ratio as the reference image. If necessary, you can crop the image in a program like GIMP or even Microsoft Paint.
It's surprisingly difficult to draw while watching your hand on the computer screen. It's much easier to look at the actual drawing while you're working on it, and then look at the computer screen to see what adjustments to make next.
There are several options controlling how the webcam and reference images are displayed. Most are self-explanatory, but for completeness they are listed below.
| Name(s) | Description |
|---|---|
| Toggle view | Switch between perspective correction applied to reference image or to webcam video |
| Edge detection on/off | Show/hide the outlines of the images |
| Webcam list | See webcam section |
| Opacity | Opacity of the reference over the webcam video |
| Brightness & contrast | Use to correct webcam video |
| Color temperature | Corrects warm/cool color shifts, e.g. from yellow incandescent lighting |
| Scale & pan | Use to zoom in on different areas |
| Webcam dimensions | See webcam section |
Copyright © 2021 Sal Elder